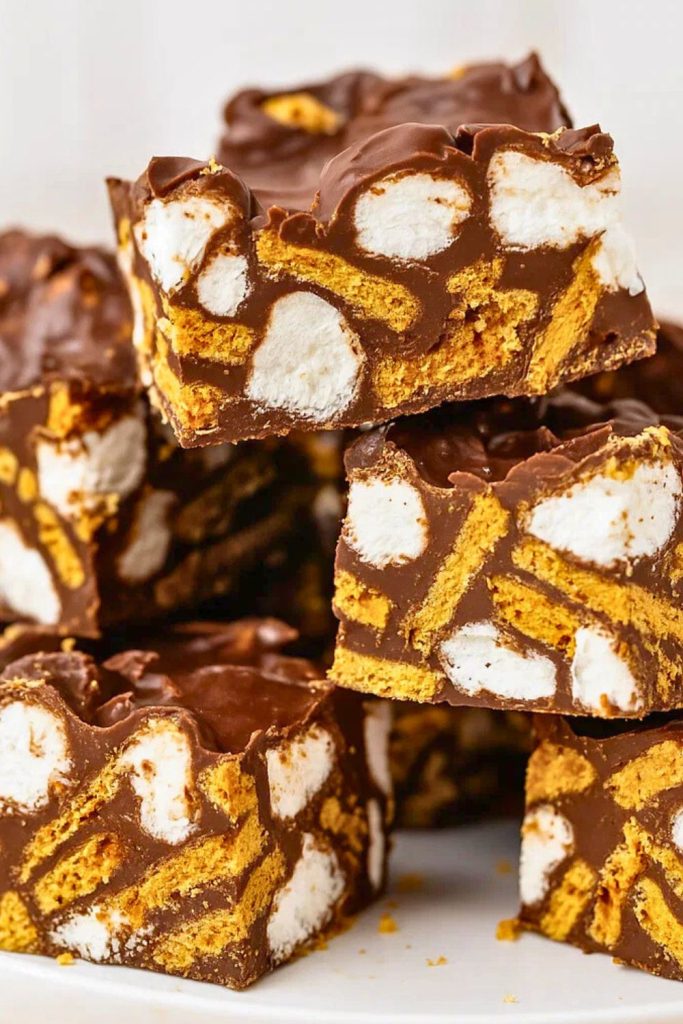
Get ready to enjoy the taste of summer with these No Bake S’mores Bars – a gooey, crunchy, and chocolatey treat that’s easy to whip up and even easier to love!

If you’re someone who dreams of campfire s’mores but doesn’t want the hassle of starting a fire or heating the oven, these bars are for you.
I created this recipe during one of those hot July evenings when turning on the oven felt like a crime.
I wanted something fun, nostalgic, and kid-friendly – so I took inspiration from traditional s’mores and turned them into a chilled dessert bar.
What came out of that experiment is now a family favorite.
These bars deliver all the flavor of s’mores, minus the mess and effort.
Why You’ll Love This
- No Oven Required – Perfect for hot summer days when you want a treat without heating up your kitchen.
- Easy to Make – Just a few simple steps and everyday ingredients, and you’re done!
- Make-Ahead Friendly – Great for picnics, parties, or storing in the fridge for whenever cravings strike.
- Crowd Pleaser – Kids and adults both go crazy for this nostalgic, marshmallowy snack.

Prep Time: 15 minutes
Cook Time: 0 minutes
Total Time: 1 hour (includes chilling time)
Cuisines: American, Dessert
Servings: 12 bars
Estimated Cost: $6 – $8
Equipment:
- 8×8-inch square baking pan
- Parchment paper
- Large mixing bowl
- Saucepan
- Silicone spatula or wooden spoon
Ingredients

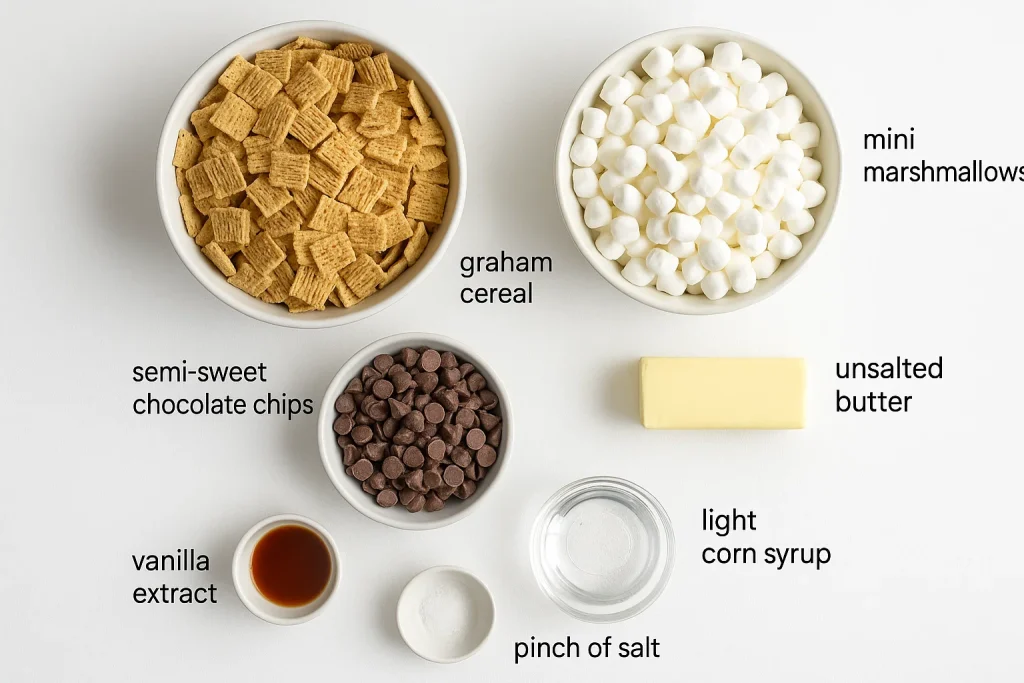
- 3 cups Golden Grahams cereal (or any graham cereal)
- 2 cups mini marshmallows, divided
- 1½ cups semi-sweet chocolate chips
- ¼ cup unsalted butter
- ¼ cup light corn syrup (or honey)
- ½ tsp vanilla extract
- Pinch of salt
Step-by-Step Instructions
- Line the Pan – Line your baking dish with parchment paper, leaving a slight overhang for easy lifting.
- Melt the Mixture – In a saucepan over low heat, melt the butter, 1 cup of mini marshmallows, chocolate chips, and corn syrup. Stir constantly until smooth and fully melted.
- Add Vanilla & Salt – Remove from heat and stir in the vanilla extract and pinch of salt.
- Mix with Cereal – Pour the melted mixture into a large bowl with the Golden Grahams cereal. Stir until everything is evenly coated.
- Fold in Extra Marshmallows – Gently fold in the remaining 1 cup of mini marshmallows for that gooey texture.
- Press into Pan – Transfer the mixture to the lined baking dish. Press it down firmly using a spatula or the back of a spoon.
- Chill – Refrigerate the bars for at least 45 minutes to firm up.
- Slice & Serve – Once chilled, lift the bars out of the pan and slice into squares.
Nutrition Facts (Per Serving – Approximate)
- Calories: 220
- Carbohydrates: 32g
- Protein: 2g
- Fat: 10g
- Saturated Fat: 6g
- Fiber: 2g
- Sugar: 20g
- Sodium: 90mg
Tips for Success
- Don’t overheat the chocolate – Low and slow melting keeps the texture smooth and prevents scorching.
- Use parchment paper – This makes cleanup easy and ensures your bars lift cleanly from the pan.
- Firm press = clean bars – Press the mixture down tightly in the pan to help the bars hold their shape when sliced.
- Chill thoroughly – Give them time in the fridge to firm up completely before cutting—don’t rush it!
No Bake S’mores Bars
Ingredients
- 3 cups Golden Grahams cereal or any graham cereal
- 2 cups mini marshmallows divided
- 1½ cups semi-sweet chocolate chips
- ¼ cup unsalted butter
- ¼ cup light corn syrup or honey
- ½ tsp vanilla extract
- Pinch of salt
Instructions
- Line the Pan – Line your baking dish with parchment paper, leaving a slight overhang for easy lifting.
- Melt the Mixture – In a saucepan over low heat, melt the butter, 1 cup of mini marshmallows, chocolate chips, and corn syrup. Stir constantly until smooth and fully melted.
- Add Vanilla & Salt – Remove from heat and stir in the vanilla extract and pinch of salt.
- Mix with Cereal – Pour the melted mixture into a large bowl with the Golden Grahams cereal. Stir until everything is evenly coated.
- Fold in Extra Marshmallows – Gently fold in the remaining 1 cup of mini marshmallows for that gooey texture.
- Press into Pan – Transfer the mixture to the lined baking dish. Press it down firmly using a spatula or the back of a spoon.
- Chill – Refrigerate the bars for at least 45 minutes to firm up.
- Slice & Serve – Once chilled, lift the bars out of the pan and slice into squares.
Notes
- Don’t overheat the chocolate – Low and slow melting keeps the texture smooth and prevents scorching.
- Use parchment paper – This makes cleanup easy and ensures your bars lift cleanly from the pan.
- Firm press = clean bars – Press the mixture down tightly in the pan to help the bars hold their shape when sliced.
- Chill thoroughly – Give them time in the fridge to firm up completely before cutting—don’t rush it!
Common Questions
Can I use honey instead of corn syrup?
Yes! Honey is a great substitute and adds a slight floral sweetness that complements the s’mores flavor.
Can I freeze these bars?
You can! Wrap them tightly in plastic wrap and freeze for up to 1 month. Thaw in the fridge before serving.
What other cereals can I use?
Try Rice Krispies or crushed graham crackers for a twist in texture—but Golden Grahams give that classic s’mores crunch.
How do I store leftovers?
Keep them in an airtight container in the fridge for up to 5 days. They’ll stay fresh and chewy!
So next time you crave that campfire flavor, skip the sticks and enjoy these No Bake S’mores Bars instead.
They’re simple, fun, and guaranteed to bring smiles all around.
Happy no-baking and sweet wishes to you and yours!


