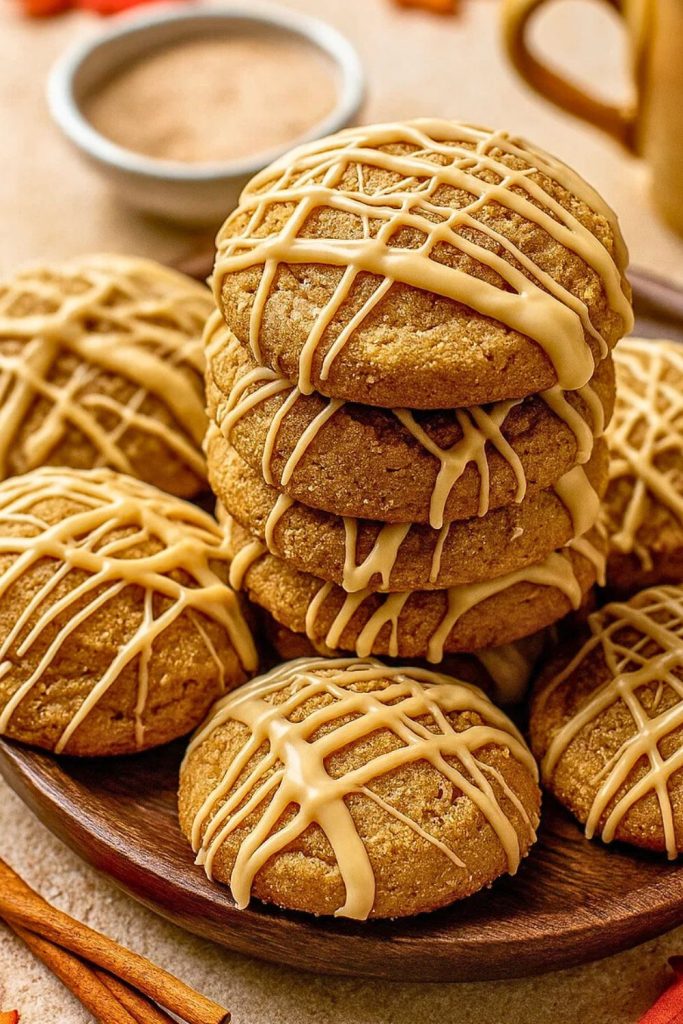
These Soft and Chewy Maple Cookies are rich, buttery, and warmly sweet, the kind of treat that makes you want to grab a blanket and settle in with a cup of tea or coffee. They are perfect for cozy fall days, holiday baking, or simply satisfying your cookie cravings any time of year. With a soft center, lightly crisp edges, and a maple glaze that’s downright irresistible, they’re a recipe worth keeping on repeat.

I first discovered maple cookies while visiting a tiny bakery on a crisp autumn morning. The baker handed me a warm cookie fresh from the oven, and I was hooked from the first bite. It was soft and tender with just the right touch of sweetness, and the maple flavor felt like pure comfort. I spent weeks testing my own version at home until I landed on this recipe. It’s a simple blend of pantry staples, real maple syrup, and a touch of warm spice. These cookies aren’t just delicious, they’re a little bite of nostalgia in every mouthful.
Why You’ll Love This
Incredible flavor
The real maple syrup and maple extract give these cookies a deep, rich flavor that you simply can’t fake. Each bite is sweet but not overpowering, with a warm caramel-like note that’s perfect for cozy weather. They taste like autumn in cookie form but can easily be enjoyed year-round.
Soft and chewy texture
If you love cookies that are tender on the inside with just a hint of crispness on the edges, this recipe is for you. The combination of brown sugar and butter creates that perfect balance, making them melt-in-your-mouth good without being cakey.
Easy to make
These maple cookies come together in under 30 minutes of active time, with no complicated steps or fancy equipment required. Even beginner bakers can whip up a batch with confidence, and they’re ideal for last-minute baking when you want something special without the stress.
Perfect for gifting and gatherings
Their warm flavor, pretty glaze, and inviting aroma make them a wonderful gift for neighbors, friends, or holiday cookie exchanges. They also travel well, so you can bake them ahead and bring them along to potlucks or family dinners.
Recipe Details
Prep Time: 15 minutes
Cook Time: 10 minutes
Total Time: 25 minutes
Cuisine Type(s): American, Dessert
Servings: 24 cookies
Estimated Cost: $8-$10
Equipment Needed
- Mixing bowls
- Electric hand mixer or stand mixer
- Measuring cups and spoons
- Rubber spatula
- Baking sheet
- Parchment paper
- Cooling rack
- Small whisk for glaze
Ingredients
For the cookies:
- 1 cup unsalted butter, softened
- 1 cup brown sugar, packed
- 1/2 cup pure maple syrup (use grade A for best flavor)
- 1 large egg, room temperature
- 1 teaspoon pure vanilla extract
- 1 teaspoon maple extract (optional but recommended for stronger flavor)
- 2 1/2 cups all-purpose flour
- 1 teaspoon baking soda
- 1/2 teaspoon baking powder
- 1/2 teaspoon salt
- 1/2 teaspoon ground cinnamon (optional for warmth)
For the glaze:
- 1 cup powdered sugar
- 2 tablespoons pure maple syrup
- 1-2 tablespoons milk or cream (adjust for desired thickness)
Ingredient Notes
- For a slightly crispier texture, reduce the maple syrup by 2 tablespoons.
- If you don’t have maple extract, you can still make the cookies, but the flavor will be milder.
- To make them gluten-free, swap in a 1:1 gluten-free baking flour.
Step-by-Step Instructions
Step 1
Preheat your oven to 350°F and line a baking sheet with parchment paper. This helps prevent sticking and makes cleanup much easier. Set the baking sheet aside while you prepare the dough.
Step 2
In a large mixing bowl, cream together the softened butter and brown sugar using an electric mixer until the mixture is light and fluffy. This step usually takes 2-3 minutes and is key for creating the right texture in your cookies.
Step 3
Add the maple syrup, egg, vanilla extract, and maple extract to the bowl. Beat again until everything is well incorporated. The mixture may look slightly separated at first, but it will smooth out as you mix.
Step 4
In a separate bowl, whisk together the flour, baking soda, baking powder, salt, and cinnamon. Slowly add this dry mixture into the wet ingredients, mixing on low speed until just combined. Overmixing can make your cookies tough, so stop as soon as you no longer see streaks of flour.
Step 5
Scoop the dough into tablespoon-sized portions and place them on the prepared baking sheet about 2 inches apart. Bake for 9-11 minutes, or until the edges are just starting to turn golden. They may look slightly underbaked in the center, but they will set as they cool.
Step 6
Transfer cookies to a cooling rack and let them cool completely before glazing. For the glaze, whisk together the powdered sugar, maple syrup, and enough milk to reach a smooth, pourable consistency. Drizzle or spread over the cooled cookies and let the glaze set before serving.
Nutrition Facts (per cookie, approx.)
Calories: 160
Protein: 2g
Carbohydrates: 22g
Fiber: 0.5g
Fat: 8g
Sodium: 95mg
Vitamin A: 5% DV
Calcium: 2% DV
Iron: 4% DV
Tips for Success
Use real maple syrup
The flavor of authentic maple syrup is unmatched. Imitation syrup will not give you the same depth of flavor, so go for the real thing.
Don’t overbake
These cookies are meant to be soft and chewy, so pull them out when the edges are set but the centers still look a little soft. They will firm up as they cool.
Cool before glazing
If you glaze while the cookies are warm, the glaze will melt and run off. Let them cool fully for the prettiest presentation.
Play with spices
Adding a pinch of nutmeg or cloves can give these cookies a holiday feel. Just a little goes a long way.
Common Questions
Can I make these ahead of time?
Yes, you can make the dough ahead and refrigerate it for up to 48 hours. You can also bake the cookies and store them in an airtight container for 3-4 days.
Can I freeze maple cookies?
Absolutely. Freeze baked cookies (without glaze) for up to 2 months. Thaw at room temperature and glaze before serving.
What can I use instead of maple extract?
If you can’t find maple extract, add a little extra vanilla extract. The flavor won’t be as strong, but they will still be delicious.
How do I make them gluten-free?
Use a gluten-free all-purpose baking blend that contains xanthan gum. This helps mimic the structure of traditional flour.
Variations and Substitutions
- Add chopped pecans or walnuts to the dough for a nutty crunch.
- For a lighter glaze, use powdered sugar and milk without maple syrup, then sprinkle with cinnamon sugar.
- Swap part of the all-purpose flour for whole wheat flour for a heartier texture.
- Use browned butter instead of regular butter for a deeper, toasty flavor.
Serving and Pairing Suggestions
Maple cookies are wonderful with a cup of coffee, hot tea, or warm apple cider. They make a great addition to a fall dessert table alongside pumpkin pie and apple crisp. You can also sandwich them with cream cheese frosting for an extra decadent treat.
Storage and Reheating Tips
Store cooled cookies in an airtight container at room temperature for up to 4 days. If you need to keep them longer, freeze them without glaze, then thaw and glaze before serving. To warm them slightly, microwave for 10 seconds, which brings back that just-baked softness.
Soft and Chewy Maple Cookies
Ingredients
For the cookies
- 1 cup unsalted butter softened
- 1 cup brown sugar packed
- ½ cup pure maple syrup use grade A for best flavor
- 1 large egg room temperature
- 1 teaspoon pure vanilla extract
- 1 teaspoon maple extract optional but recommended for stronger flavor
- 2 ½ cups all-purpose flour
- 1 teaspoon baking soda
- ½ teaspoon baking powder
- ½ teaspoon salt
- ½ teaspoon ground cinnamon optional for warmth
For the glaze
- 1 cup powdered sugar
- 2 tablespoons pure maple syrup
- 1-2 tablespoons milk or cream adjust for desired thickness
Instructions
- Preheat your oven to 350°F and line a baking sheet with parchment paper. This helps prevent sticking and makes cleanup much easier. Set the baking sheet aside while you prepare the dough.
- In a large mixing bowl, cream together the softened butter and brown sugar using an electric mixer until the mixture is light and fluffy. This step usually takes 2-3 minutes and is key for creating the right texture in your cookies.
- Add the maple syrup, egg, vanilla extract, and maple extract to the bowl. Beat again until everything is well incorporated. The mixture may look slightly separated at first, but it will smooth out as you mix.
- In a separate bowl, whisk together the flour, baking soda, baking powder, salt, and cinnamon. Slowly add this dry mixture into the wet ingredients, mixing on low speed until just combined. Overmixing can make your cookies tough, so stop as soon as you no longer see streaks of flour.
- Scoop the dough into tablespoon-sized portions and place them on the prepared baking sheet about 2 inches apart. Bake for 9-11 minutes, or until the edges are just starting to turn golden. They may look slightly underbaked in the center, but they will set as they cool.
- Transfer cookies to a cooling rack and let them cool completely before glazing. For the glaze, whisk together the powdered sugar, maple syrup, and enough milk to reach a smooth, pourable consistency. Drizzle or spread over the cooled cookies and let the glaze set before serving.
Notes
The flavor of authentic maple syrup is unmatched. Imitation syrup will not give you the same depth of flavor, so go for the real thing. Don’t overbake
These cookies are meant to be soft and chewy, so pull them out when the edges are set but the centers still look a little soft. They will firm up as they cool. Cool before glazing
If you glaze while the cookies are warm, the glaze will melt and run off. Let them cool fully for the prettiest presentation. Play with spices
Adding a pinch of nutmeg or cloves can give these cookies a holiday feel. Just a little goes a long way.
These maple cookies are my go-to when I want a quick, cozy dessert that’s big on flavor and easy to share. Whether you’re baking for a holiday cookie swap, a family gathering, or simply to treat yourself, they’re bound to become a favorite in your kitchen. I hope you enjoy making them as much as I do, and I can’t wait for you to take that first bite. Thank you for baking along with me today, friend, and happy cookie-making!