This dreamy, creamy, citrus-packed Orange Creamsicle Fudge is like summer in a bite! With layers of sweet orange and vanilla, it melts in your mouth and tastes just like the classic frozen treat. This no-bake dessert is perfect for parties, holidays, or whenever you’re craving a nostalgic bite of sunshine.

As a child, I loved chasing down the ice cream truck for my favorite orange creamsicle popsicle.
That perfect mix of zesty citrus and smooth vanilla was pure joy on a stick.
Years later, I recreated that flavor in this easy homemade fudge recipe, which became a family tradition during summer get-togethers and holiday trays.
It’s a bright and cheerful treat that instantly brings smiles.
Why You’ll Love This
- No Baking Required – This is a quick stovetop recipe with minimal effort and no oven needed.
- Tastes Just Like the Real Deal – The combination of orange extract and vanilla gives that authentic creamsicle flavor.
- Perfect for Parties – It’s an eye-catching treat that slices beautifully and adds vibrant color to dessert tables.
- Freezer Friendly – You can make it ahead of time and store it for weeks.

Prep Time: 10 minutes
Cook Time: 10 minutes
Total Time: 2 hours (including chill time)
Cuisines: American
Servings: 36 small squares
Estimated Cost: $8 – $10
Equipment:
- 8×8 inch square baking pan
- Parchment paper
- Saucepan
- Spatula
- Mixing bowls
- Measuring cups and spoons
Ingredients
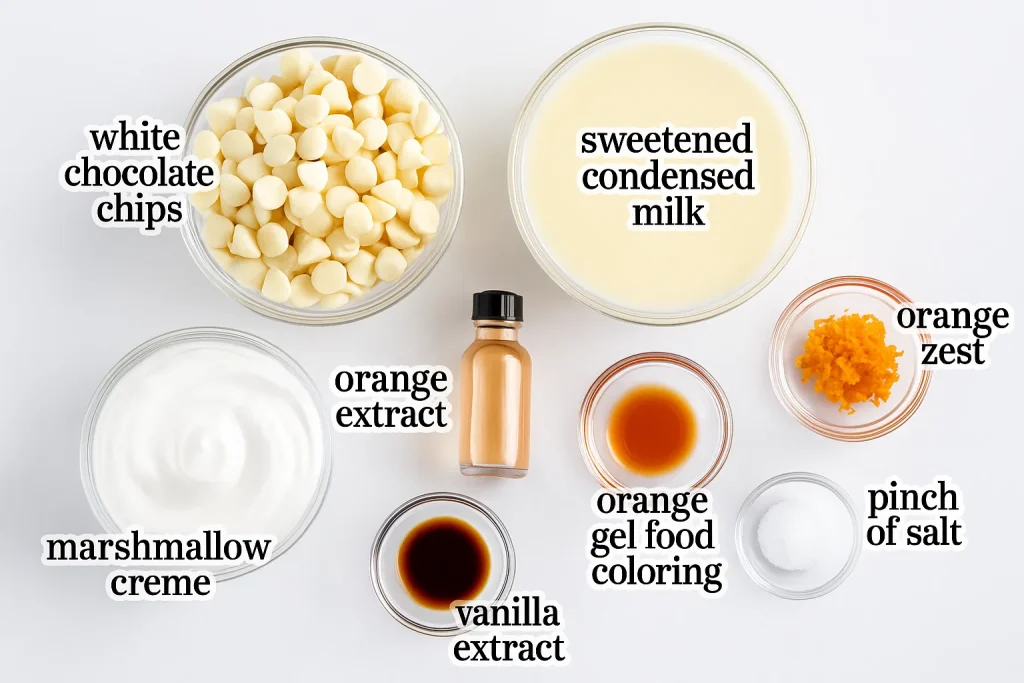
- 3 cups white chocolate chips
- 1 (14 oz) can sweetened condensed milk
- 1/2 cup marshmallow creme
- 2 tsp orange extract
- Zest of 1 orange (optional, for extra zing)
- Orange gel food coloring (a few drops, optional)
- 1 tsp vanilla extract
- Pinch of salt
Step-by-Step Instructions
- Prepare the Pan: Line an 8×8 baking pan with parchment paper, leaving some overhang to lift the fudge out easily later.
- Melt the Base: In a medium saucepan over low heat, combine white chocolate chips and sweetened condensed milk. Stir constantly until the mixture is fully melted and smooth.
- Add Marshmallow Creme & Divide: Stir in the marshmallow creme and pinch of salt until combined. Quickly divide the mixture into two bowls.
- Flavor the Layers:
- In one bowl, stir in orange extract and a few drops of orange food coloring (and orange zest if using) to create the orange layer.
- In the second bowl, stir in vanilla extract for the vanilla cream layer.
- Layer the Fudge:
- Pour the orange mixture into the prepared pan and spread it evenly.
- Gently spoon the vanilla mixture on top and spread it smoothly. You can swirl the layers lightly for a marbled look or leave them distinct.
- Chill to Set: Refrigerate the fudge for at least 2 hours or until completely set.
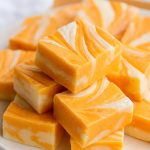
- Slice & Serve: Use the parchment to lift the fudge from the pan. Cut into 1-inch squares and enjoy!
Nutrition Facts
Per square (approximate)
- Calories: 120
- Carbohydrates: 16g
- Sugar: 14g
- Fat: 6g
- Saturated Fat: 4g
- Protein: 1g
- Sodium: 20mg
Tips for Success
- Use Gel Food Coloring: It gives a vibrant hue without thinning the fudge mixture.
- Don’t Overheat: Melt the chocolate gently over low heat to avoid seizing or burning.
- Work Quickly: The fudge sets fast once off the heat—have your layers ready to go.
- Let It Fully Set: Be patient and refrigerate for a full 2 hours before slicing for clean edges.
Orange Creamsicle Fudge
Ingredients
- 3 cups white chocolate chips
- 1 (14 oz) can sweetened condensed milk
- ½ cup marshmallow creme
- 2 tsp orange extract
- Zest of 1 orange optional, for extra zing
- Orange gel food coloring a few drops, optional
- 1 tsp vanilla extract
- Pinch of salt
Instructions
- Prepare the Pan: Line an 8×8 baking pan with parchment paper, leaving some overhang to lift the fudge out easily later.
- Melt the Base: In a medium saucepan over low heat, combine white chocolate chips and sweetened condensed milk. Stir constantly until the mixture is fully melted and smooth.
- Add Marshmallow Creme & Divide: Stir in the marshmallow creme and pinch of salt until combined. Quickly divide the mixture into two bowls.
- In one bowl, stir in orange extract and a few drops of orange food coloring (and orange zest if using) to create the orange layer.
- In the second bowl, stir in vanilla extract for the vanilla cream layer.
- Pour the orange mixture into the prepared pan and spread it evenly.
- Gently spoon the vanilla mixture on top and spread it smoothly. You can swirl the layers lightly for a marbled look or leave them distinct.
- Chill to Set: Refrigerate the fudge for at least 2 hours or until completely set.
- Slice & Serve: Use the parchment to lift the fudge from the pan. Cut into 1-inch squares and enjoy!
Notes
- Use Gel Food Coloring: It gives a vibrant hue without thinning the fudge mixture.
- Don’t Overheat: Melt the chocolate gently over low heat to avoid seizing or burning.
- Work Quickly: The fudge sets fast once off the heat—have your layers ready to go.
- Let It Fully Set: Be patient and refrigerate for a full 2 hours before slicing for clean edges.
Common Questions
1. Can I use orange juice instead of orange extract?
Not recommended—it won’t provide enough flavor without affecting the texture.
2. How long does orange creamsicle fudge last?
It lasts up to 2 weeks in the fridge in an airtight container or 2–3 months in the freezer.
3. Can I make this dairy-free?
You can try using dairy-free white chocolate and coconut condensed milk, but results may vary in texture.
4. Can I double the recipe?
Yes! Use a 9×13 pan and double all ingredients for a larger batch.
This Orange Creamsicle Fudge is a treat that’s both nostalgic and irresistible.
Whether you’re making it for a summer party, a festive gift box, or just to satisfy your sweet tooth, it’s sure to bring a pop of citrusy joy to everyone who tries it.
Happy cooking and sweet wishes always!