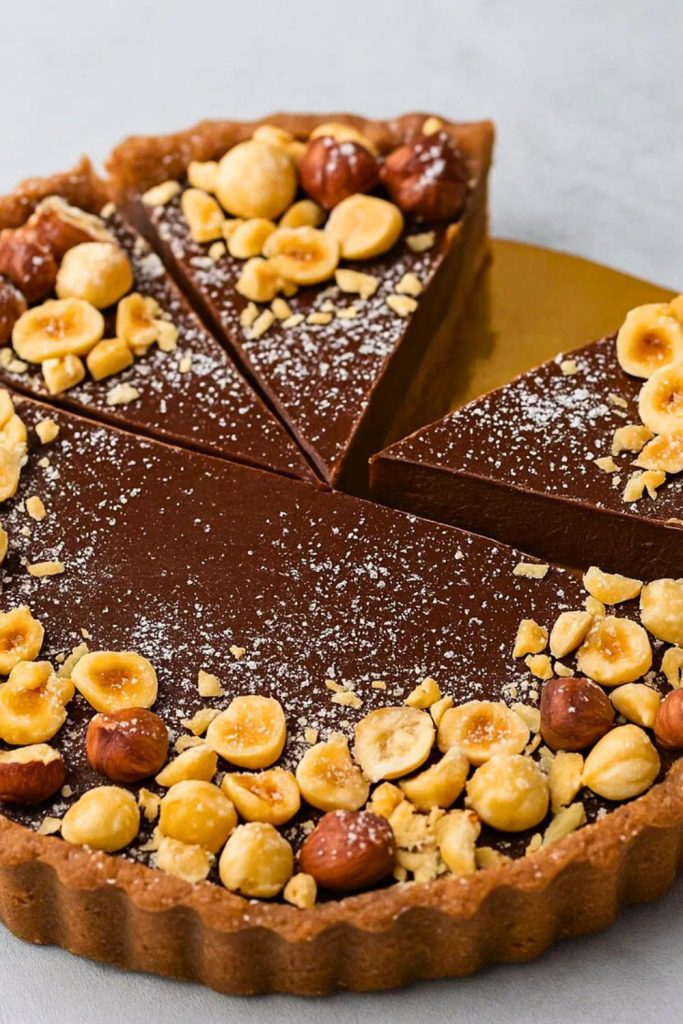
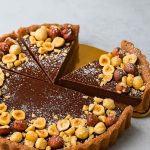
There is something truly magical about a chocolate hazelnut tart. The rich, velvety chocolate filling paired with the nutty, slightly crunchy hazelnut flavor makes every bite feel like a small celebration. It is the kind of dessert that feels fancy enough for special occasions but simple enough to make any ordinary day feel extraordinary. Whether you are serving it at a dinner party, gifting it to a friend, or indulging in a quiet moment with your favorite coffee, this tart hits all the right notes.
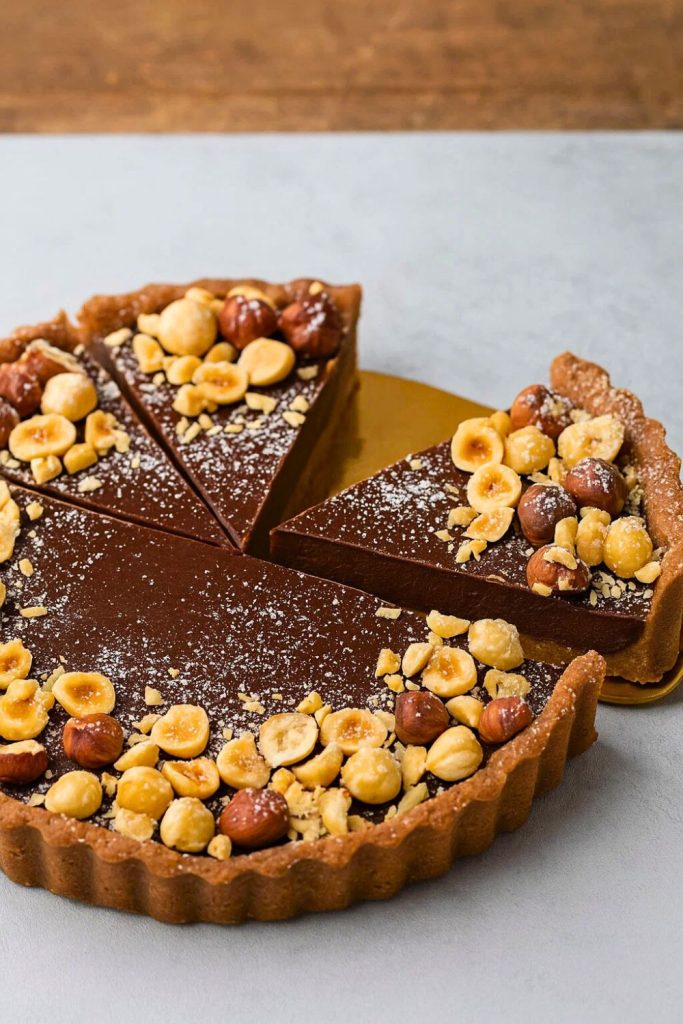
I first discovered this chocolate hazelnut tart on a chilly afternoon when I was craving something indulgent but not too complicated. I wanted a dessert that felt luxurious without requiring hours in the kitchen. After a few experiments with different crusts and fillings, I finally landed on this version. The crust is buttery and crisp, the chocolate filling is smooth and melt-in-your-mouth, and the toasted hazelnuts on top add that perfect little crunch. Every time I make it, my kitchen smells like a bakery and I can hardly wait for the first slice.
Why You’ll Love This
First, the flavor combination is irresistible. The deep, creamy chocolate paired with the nutty aroma of toasted hazelnuts creates a dessert that feels rich and satisfying. Every bite has layers of flavor that linger just long enough to make you reach for another slice.
Second, the texture is a dream. The crust is crisp and buttery, giving a perfect contrast to the smooth, velvety chocolate filling. Topped with chopped hazelnuts, each bite offers a delightful crunch that makes every mouthful interesting.
Third, it is easier to make than it looks. Despite its impressive appearance, the tart comes together with simple ingredients and basic kitchen tools. Even if you are not a seasoned baker, the step-by-step instructions guide you through the process with ease.
Fourth, it is versatile. You can dress it up with a drizzle of caramel, a sprinkle of sea salt, or even a dusting of powdered sugar. It works well for celebrations, cozy nights in, or as a thoughtful homemade gift. Plus, it can easily be adapted for dietary preferences with a few smart substitutions.
Prep Time: 20 minutes
Cook Time: 25 minutes
Total Time: 45 minutes
Cuisine Type: Dessert, European-Inspired
Servings: 8
Estimated Cost: Moderate
Equipment Needed:
- 9-inch tart pan with removable bottom
- Mixing bowls
- Whisk
- Spatula
- Rolling pin
- Saucepan
- Food processor (optional for chopping hazelnuts)
- Measuring cups and spoons
- Cooling rack
Ingredients
For the crust:
- 1 1/4 cups all-purpose flour
- 1/4 cup powdered sugar
- 1/2 cup unsalted butter, cold and cubed
- 1 large egg yolk
- 1-2 tablespoons cold water
For the chocolate filling:
- 1 cup heavy cream
- 8 ounces semi-sweet chocolate, finely chopped
- 2 tablespoons unsalted butter
- 1 teaspoon pure vanilla extract
- Pinch of salt
For the topping:
- 1/2 cup hazelnuts, toasted and roughly chopped
- Optional: powdered sugar or cocoa powder for dusting
Helpful Notes:
- You can substitute hazelnuts with almonds or pecans if desired.
- For a gluten-free crust, swap all-purpose flour with a gluten-free flour blend.
- Store leftover tart in an airtight container in the fridge for up to 3 days.
Step-by-Step Instructions
- Begin with the crust. In a mixing bowl, combine the flour and powdered sugar. Add the cold butter cubes and use your fingers or a pastry cutter to mix until the mixture resembles coarse crumbs. Beat the egg yolk lightly and mix it in, adding cold water a little at a time until the dough comes together.
- Press the dough into your tart pan evenly, making sure to cover the bottom and sides. Use the back of a spoon to smooth it out. Chill the crust in the refrigerator for at least 15 minutes. This helps it stay firm during baking and ensures a crisp texture.
- Preheat the oven to 350 degrees Fahrenheit. Line the crust with parchment paper or foil and fill it with pie weights or dry beans. Bake for 15 minutes, then remove the weights and bake for another 5-10 minutes until lightly golden. Let the crust cool completely on a cooling rack.
- While the crust cools, prepare the chocolate filling. In a saucepan, heat the heavy cream over medium heat until it just begins to simmer. Remove from heat and pour over the chopped chocolate in a heatproof bowl. Let it sit for 2-3 minutes, then stir until smooth and glossy. Add butter, vanilla, and a pinch of salt, stirring until fully combined.
- Pour the chocolate filling into the cooled tart shell. Smooth the top with a spatula and sprinkle the toasted hazelnuts evenly over the surface. You can press them gently into the chocolate to make sure they stick.
- Chill the tart in the refrigerator for at least 2 hours or until the filling is set. When ready to serve, dust lightly with powdered sugar or cocoa powder if desired. Slice carefully using a sharp knife, wiping the blade between cuts for clean slices. Enjoy the rich chocolate and nutty goodness with your favorite cup of coffee or tea.
Nutrition Facts
Per serving (1/8 of tart):
- Calories: 420
- Protein: 5 grams
- Carbohydrates: 35 grams
- Fiber: 4 grams
- Fat: 30 grams
- Sodium: 70 milligrams
- Vitamin A: 15 percent DV
- Calcium: 6 percent DV
- Iron: 18 percent DV
Tips for Success
Always use cold butter for the crust. Cold butter ensures a flaky, tender base that does not become greasy.
Chop chocolate finely. Smaller pieces melt more evenly and create a smoother filling with a glossy finish.
Toast the hazelnuts. Toasting brings out their natural flavor and adds a pleasant crunch that complements the chocolate.
Chill before slicing. Allowing the tart to set in the fridge ensures clean slices and prevents the chocolate from melting too quickly when served.
Common Questions
Can I make this tart ahead of time? Absolutely. Prepare it a day in advance and keep it refrigerated. It actually tastes even better as the flavors meld overnight.
What can I use instead of hazelnuts? Almonds, pecans, or even pistachios can work beautifully. Toast them lightly for the best flavor.
Is there a dairy-free option? Yes. Use coconut cream instead of heavy cream and a dairy-free chocolate. The texture will be slightly different but still delicious.
How do I store leftovers? Store the tart in an airtight container in the fridge for up to 3 days. It can also be frozen for up to a month. Thaw in the fridge before serving.
Variations and Substitutions
For a salted caramel twist, drizzle caramel sauce over the chocolate filling before adding the hazelnuts. You can also add a pinch of sea salt on top for a sweet and salty flavor combination.
Try using milk chocolate or dark chocolate depending on your preference. For a more indulgent flavor, mix in a tablespoon of espresso powder into the chocolate filling.
For a seasonal touch, add fresh raspberries or slices of pear on top before chilling. This not only looks beautiful but adds a fresh, fruity flavor that complements the chocolate.
Serving and Pairing Suggestions
Serve the chocolate hazelnut tart with a dollop of whipped cream or a scoop of vanilla ice cream for a classic pairing. A cup of freshly brewed coffee, espresso, or hot chocolate makes it even more indulgent.
If you are hosting a dessert platter, pair the tart with shortbread cookies, fresh berries, or a light fruit salad. The combination of textures and flavors will impress your guests and make the table look inviting.
Chocolate Hazelnut Tart
Equipment
- 9-inch tart pan with removable bottom
- Mixing bowls
- Whisk
- Spatula
- Rolling Pin
- Saucepan
- Food processor (optional for chopping hazelnuts)
- Measuring cups and spoons
- Cooling rack
Ingredients
For the crust:
- 1 ¼ cups all-purpose flour
- ¼ cup powdered sugar
- ½ cup unsalted butter cold and cubed
- 1 large egg yolk
- 1-2 tablespoons cold water
For the chocolate filling:
- 1 cup heavy cream
- 8 ounces semi-sweet chocolate finely chopped
- 2 tablespoons unsalted butter
- 1 teaspoon pure vanilla extract
- Pinch of salt
For the topping:
- ½ cup hazelnuts toasted and roughly chopped
- Optional: powdered sugar or cocoa powder for dusting
Instructions
- Begin with the crust. In a mixing bowl, combine the flour and powdered sugar. Add the cold butter cubes and use your fingers or a pastry cutter to mix until the mixture resembles coarse crumbs. Beat the egg yolk lightly and mix it in, adding cold water a little at a time until the dough comes together.
- Press the dough into your tart pan evenly, making sure to cover the bottom and sides. Use the back of a spoon to smooth it out. Chill the crust in the refrigerator for at least 15 minutes. This helps it stay firm during baking and ensures a crisp texture.
- Preheat the oven to 350 degrees Fahrenheit. Line the crust with parchment paper or foil and fill it with pie weights or dry beans. Bake for 15 minutes, then remove the weights and bake for another 5-10 minutes until lightly golden. Let the crust cool completely on a cooling rack.
- While the crust cools, prepare the chocolate filling. In a saucepan, heat the heavy cream over medium heat until it just begins to simmer. Remove from heat and pour over the chopped chocolate in a heatproof bowl. Let it sit for 2-3 minutes, then stir until smooth and glossy. Add butter, vanilla, and a pinch of salt, stirring until fully combined.
- Pour the chocolate filling into the cooled tart shell. Smooth the top with a spatula and sprinkle the toasted hazelnuts evenly over the surface. You can press them gently into the chocolate to make sure they stick.
- Chill the tart in the refrigerator for at least 2 hours or until the filling is set. When ready to serve, dust lightly with powdered sugar or cocoa powder if desired. Slice carefully using a sharp knife, wiping the blade between cuts for clean slices. Enjoy the rich chocolate and nutty goodness with your favorite cup of coffee or tea.
There is something special about making a chocolate hazelnut tart from scratch. It is rich yet approachable, indulgent yet comforting, and simple enough to make any day feel celebratory. I hope this recipe inspires you to bring a little chocolate magic into your kitchen. Whether you are enjoying it with loved ones or savoring a quiet moment by yourself, this tart is guaranteed to put a smile on your face. Thank you for spending time in my kitchen and happy baking.