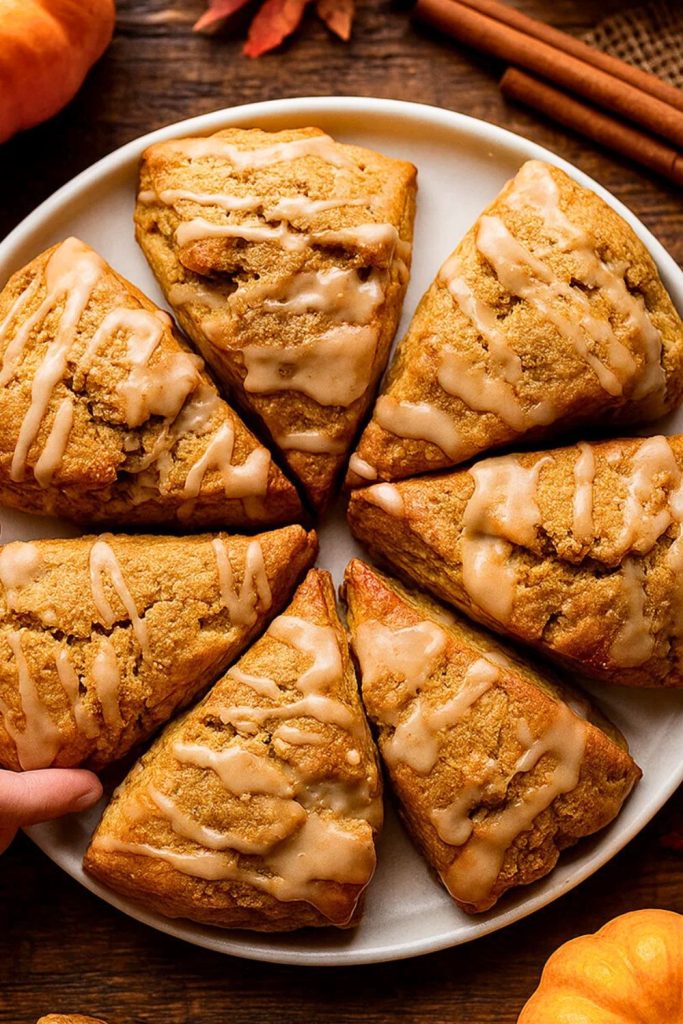
There is something incredibly cozy about a warm, freshly baked pumpkin scone. These treats are soft on the inside with just the right amount of golden crisp on the outside. With the comforting flavor of pumpkin and a hint of autumn spices, they feel like a little slice of fall in every bite. Perfect for breakfast with a hot cup of coffee, an afternoon snack, or even a sweet addition to a brunch spread, these scones are as versatile as they are delicious.
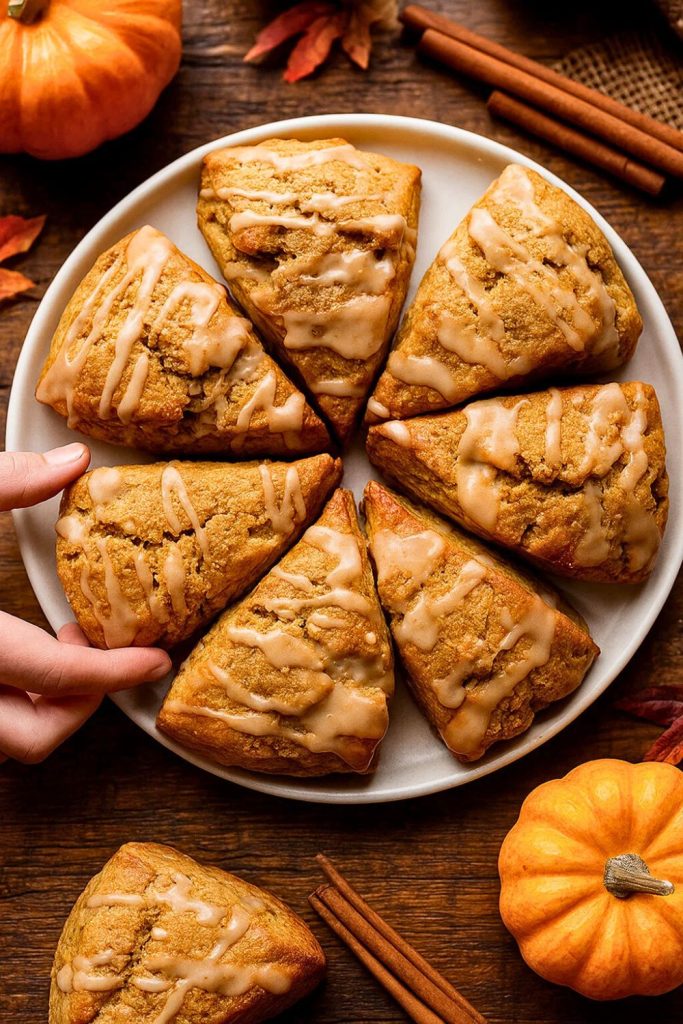
I first tried pumpkin scones on a crisp October morning at a local bakery. The aroma of cinnamon, nutmeg, and pumpkin filled the air and instantly felt like home. I went back week after week, savoring every bite and eventually decided to create my own version in my kitchen. After a few trials, I landed on a recipe that is easy to make, perfectly tender, and bursting with cozy fall flavors. Now, sharing it with you feels like passing along a warm, homemade hug.
Why You’ll Love This
First, these scones are incredibly flavorful. The natural sweetness of pumpkin paired with warm spices like cinnamon and nutmeg creates a comforting taste that feels indulgent yet not overpowering. Each bite is rich and aromatic, making them irresistible with a cup of tea or coffee.
Second, the texture is just perfect. The scones are tender and fluffy on the inside while maintaining a slightly crisp exterior. They are soft enough to enjoy without feeling heavy, yet sturdy enough to hold together if you want to take them on the go.
Third, this recipe is super easy to make. With simple ingredients that you probably already have in your pantry, these scones come together quickly. There is no complicated technique required, so even beginner bakers can feel confident creating these cozy treats.
Finally, these pumpkin scones are versatile. You can enjoy them plain, drizzle them with a sweet glaze, or add mix-ins like chocolate chips or chopped nuts. They also make a great gift or addition to holiday breakfast spreads, bringing a touch of homemade warmth to any occasion.
Recipe Details
Prep Time: 15 minutes
Cook Time: 20 minutes
Total Time: 35 minutes
Cuisine Type(s): American, Breakfast, Brunch, Bakery
Servings: 8 scones
Estimated Cost: Moderate
Equipment Needed:
- Large mixing bowl
- Medium bowl for wet ingredients
- Whisk
- Pastry cutter or fork
- Baking sheet
- Parchment paper or silicone mat
- Measuring cups and spoons
- Cooling rack
- Optional: pastry brush for egg wash
Ingredients
- 2 cups all-purpose flour, plus more for dusting
- 1/3 cup granulated sugar
- 1 tablespoon baking powder
- 1/2 teaspoon salt
- 1 teaspoon ground cinnamon
- 1/2 teaspoon ground nutmeg
- 1/4 teaspoon ground ginger
- 1/2 cup unsalted butter, cold and cut into small cubes
- 1/2 cup pumpkin puree (not pumpkin pie filling)
- 1 large egg
- 1 teaspoon vanilla extract
- 2-3 tablespoons milk or cream
Optional toppings:
- Coarse sugar for sprinkling
- Glaze: 1 cup powdered sugar, 2-3 tablespoons milk, 1/2 teaspoon vanilla extract
Notes: Pumpkin puree can be swapped for sweet potato puree for a slightly different flavor. Cold butter ensures a flaky texture, so keep it chilled until ready to mix.
Step-by-Step Instructions
- Preheat your oven to 400 degrees Fahrenheit and line a baking sheet with parchment paper. In a large mixing bowl, whisk together the flour, sugar, baking powder, salt, cinnamon, nutmeg, and ginger. Mixing the dry ingredients first ensures the spices are evenly distributed for maximum flavor.
- Add the cold butter cubes to the flour mixture. Using a pastry cutter or two forks, cut the butter into the flour until the mixture resembles coarse crumbs with pea-sized pieces. This step is key for creating tender, flaky scones, so avoid overmixing.
- In a medium bowl, whisk together the pumpkin puree, egg, vanilla extract, and milk or cream. Make sure the mixture is smooth and well combined. Pour the wet ingredients into the dry ingredients and gently stir until just combined. Do not overmix or the scones may become dense.
- Turn the dough out onto a lightly floured surface. Gently knead it a few times to bring it together, then pat it into a circle about 1 inch thick. Using a knife or pizza cutter, cut the circle into 8 wedges. Transfer the scones to the prepared baking sheet, spacing them slightly apart.
- Optional: brush the tops with a little milk or cream and sprinkle with coarse sugar for a golden, slightly crunchy topping. Bake in the preheated oven for 18-20 minutes, or until the scones are lightly golden and a toothpick inserted into the center comes out clean.
- Remove from the oven and transfer the scones to a cooling rack for 10 minutes. If desired, drizzle with a simple glaze while still slightly warm. Serve immediately with your favorite hot beverage or store in an airtight container for up to 3 days.
Nutrition Facts
Per scone (approximate):
- Calories: 250
- Protein: 4 grams
- Carbohydrates: 34 grams
- Fiber: 2 grams
- Fat: 11 grams
- Sodium: 220 mg
- Vitamin A: 100% of daily value
- Vitamin C: 2% of daily value
- Calcium: 4% of daily value
- Iron: 6% of daily value
Tips for Success
Always use cold butter. This helps the scones stay tender and flaky rather than dense. Keep it in small cubes for easy mixing.
Do not overmix the dough. Stir until the wet and dry ingredients are just combined. Overmixing can make your scones tough and less airy.
Pat the dough gently when shaping. Handle the dough as little as possible to keep the scones light and tender.
Preheat your oven fully. A hot oven ensures the scones rise properly and develop that beautiful golden crust.
Common Questions
Can I use canned pumpkin pie filling instead of pumpkin puree?
Canned pumpkin pie filling is sweetened and spiced, which may alter the flavor balance. Use plain pumpkin puree for the most consistent results.
Can I make these scones gluten-free?
Yes, a 1-to-1 gluten-free baking flour can replace all-purpose flour. The texture may be slightly different, but the flavor remains delicious.
How should I store leftover scones?
Store scones in an airtight container at room temperature for up to 3 days. They can also be frozen for up to 2 months and reheated in the oven or microwave.
Can I add mix-ins like chocolate chips or nuts?
Absolutely. Fold in 1/2 cup of chocolate chips, chopped nuts, or dried fruit after combining the wet and dry ingredients for extra flavor and texture.
Variations and Substitutions
Try swapping the spices for a chai spice mix for a different twist. For a slightly richer scone, use half butter and half cream cheese. Pumpkin puree can also be replaced with sweet potato puree for a unique flavor variation.
Serving and Pairing Suggestions
Pumpkin scones are perfect alongside a hot cup of coffee, chai tea, or a latte. For a brunch spread, serve with fresh fruit, yogurt, or a smear of cream cheese or butter. They also pair wonderfully with a drizzle of maple glaze for an extra touch of sweetness.

Pumpkin Scones
Equipment
- Large mixing bowl
- Medium bowl for wet ingredients
- Whisk
- Pastry cutter or fork
- Baking sheet
- Parchment paper or silicone mat
- Measuring cups and spoons
- Cooling rack
- Optional: pastry brush for egg wash
Ingredients
- 2 cups all-purpose flour plus more for dusting
- ⅓ cup granulated sugar
- 1 tablespoon baking powder
- ½ teaspoon salt
- 1 teaspoon ground cinnamon
- ½ teaspoon ground nutmeg
- ¼ teaspoon ground ginger
- ½ cup unsalted butter cold and cut into small cubes
- ½ cup pumpkin puree not pumpkin pie filling
- 1 large egg
- 1 teaspoon vanilla extract
- 2-3 tablespoons milk or cream
Instructions
- Preheat your oven to 400 degrees Fahrenheit and line a baking sheet with parchment paper. In a large mixing bowl, whisk together the flour, sugar, baking powder, salt, cinnamon, nutmeg, and ginger. Mixing the dry ingredients first ensures the spices are evenly distributed for maximum flavor.
- Add the cold butter cubes to the flour mixture. Using a pastry cutter or two forks, cut the butter into the flour until the mixture resembles coarse crumbs with pea-sized pieces. This step is key for creating tender, flaky scones, so avoid overmixing.
- In a medium bowl, whisk together the pumpkin puree, egg, vanilla extract, and milk or cream. Make sure the mixture is smooth and well combined. Pour the wet ingredients into the dry ingredients and gently stir until just combined. Do not overmix or the scones may become dense.
- Turn the dough out onto a lightly floured surface. Gently knead it a few times to bring it together, then pat it into a circle about 1 inch thick. Using a knife or pizza cutter, cut the circle into 8 wedges. Transfer the scones to the prepared baking sheet, spacing them slightly apart.
- Optional: brush the tops with a little milk or cream and sprinkle with coarse sugar for a golden, slightly crunchy topping. Bake in the preheated oven for 18-20 minutes, or until the scones are lightly golden and a toothpick inserted into the center comes out clean.
- Remove from the oven and transfer the scones to a cooling rack for 10 minutes. If desired, drizzle with a simple glaze while still slightly warm. Serve immediately with your favorite hot beverage or store in an airtight container for up to 3 days.
These pumpkin scones are easy to make, cozy, and perfect for sharing with family and friends. They bring warmth to chilly mornings and make any coffee break feel special. I hope you try them soon and enjoy them as much as I do. Thank you for spending a little time in my kitchen today. Happy baking and happy fall!