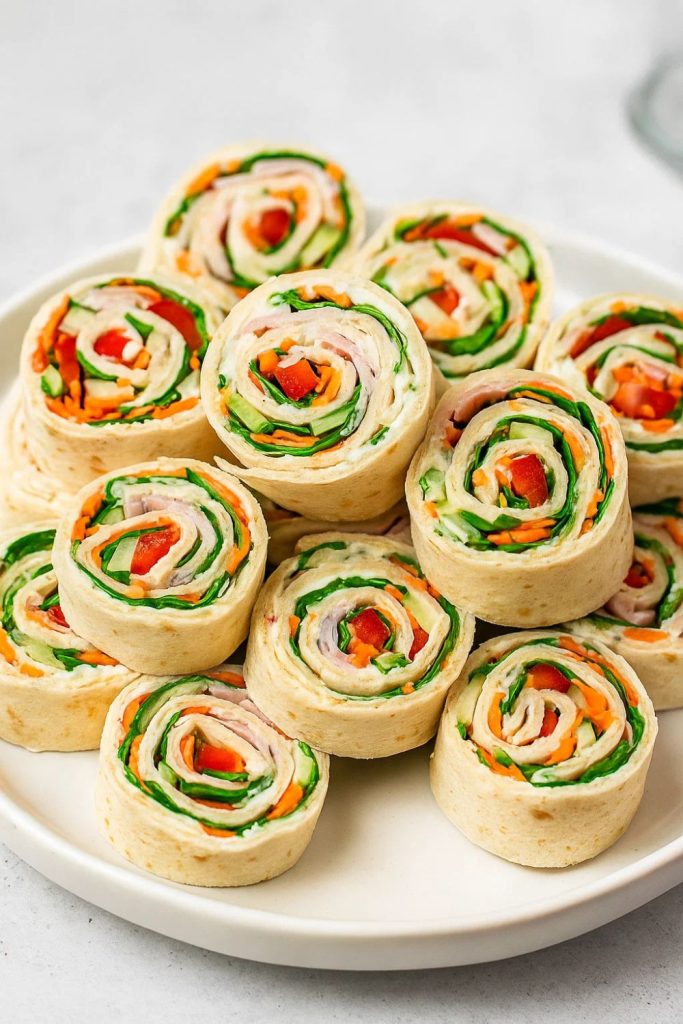
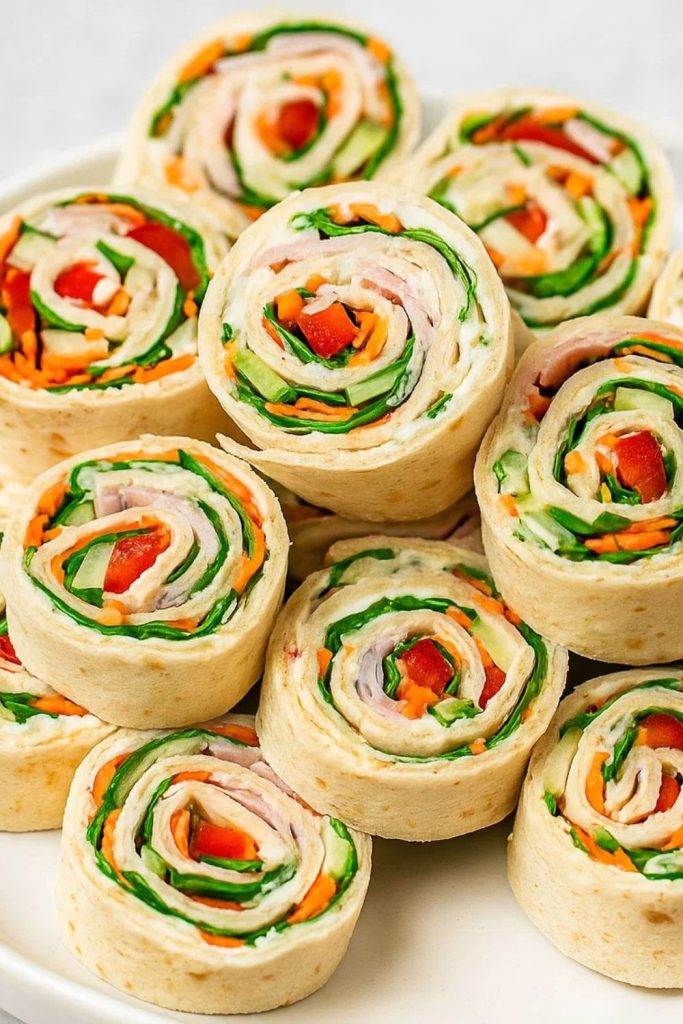
If you’re looking for a fun, colorful, and crowd-pleasing appetizer or lunch idea, these Pinwheel Wraps are exactly what you need. Easy to make, endlessly customizable, and absolutely delicious, pinwheel wraps bring together layers of flavor in every bite. Whether for a lunchbox, potluck, picnic, or party platter, they’re sure to disappear fast!
These little roll-ups have been a hit in my kitchen for years.
I remember the first time I saw them at a family gathering.
They looked fancy, colorful, and bite-sized — the perfect finger food.
At first, I assumed they were complicated to make. But when I asked my cousin how she made them, I was shocked by the simplicity.
From that day on, I was hooked. I’ve tried dozens of variations since — from classic turkey and cheese to veggie-packed hummus versions.
They’ve become my go-to for school lunches, bridal showers, and casual game nights.
And the best part? You can prep them ahead of time and slice just before serving — talk about stress-free entertaining.
Why You’ll Love This
1. They’re Quick and No-Fuss
You don’t need a stove, oven, or fancy equipment — just a cutting board and a knife. These wraps come together in minutes, making them perfect for busy weeknights or last-minute guests. No cooking means fewer dishes, less mess, and more time to enjoy your food.
2. Endless Filling Possibilities
From deli meats and cheese to hummus and grilled veggies, the options are truly endless. You can use whatever’s in your fridge to customize these wraps to your liking. Plus, they cater easily to dietary needs — go low-carb, vegetarian, or even gluten-free.
3. Ideal for Make-Ahead Meals
Pinwheel wraps hold up beautifully in the fridge, making them great for meal prep. Assemble them the night before, wrap in plastic, and slice right before serving. They also travel well, which makes them perfect for packed lunches and picnics.
4. Visually Appealing and Fun
The colorful spiral pattern of the sliced pinwheels makes any plate look instantly appetizing. They’re kid-friendly and elegant enough for adults, too. Whether laid out on a platter or packed in a lunchbox, they always look like you went the extra mile — without much extra effort.
Recipe Details
Prep Time: 15 minutes
Cook Time: 0 minutes
Total Time: 15 minutes
Cuisine Type(s): American, Fusion
Servings: 6–8 (about 24–30 pinwheels)
Estimated Cost: $10–15 depending on fillings
Equipment Needed:
- Cutting board
- Sharp knife or serrated knife
- Spatula or butter knife
- Plastic wrap or parchment paper
- Toothpicks (optional for serving)
Ingredients
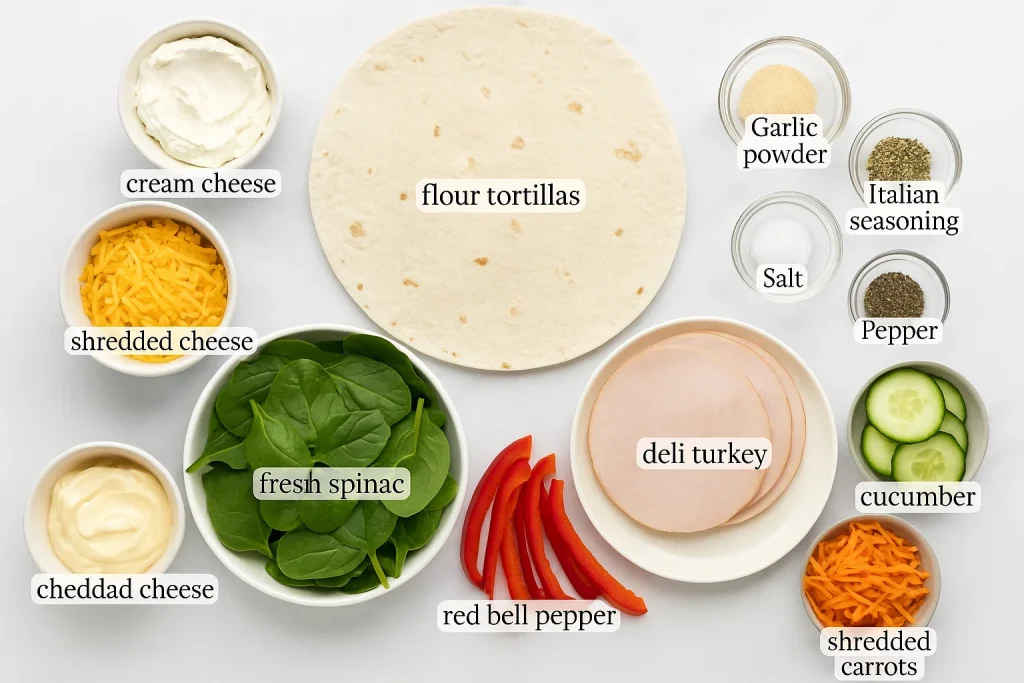
- 4 large flour tortillas (10-inch; spinach or tomato-flavored for color if desired)
- 8 oz cream cheese, softened
- ¼ cup mayonnaise (optional, for a creamier base)
- 1 tsp garlic powder
- 1 tsp dried Italian seasoning
- 6–8 slices deli turkey or ham (or a mix)
- 6 slices cheddar or provolone cheese
- 1 cup baby spinach or lettuce leaves, washed and dried
- ½ red bell pepper, thinly sliced
- ½ cucumber, julienned or thinly sliced
- ¼ cup shredded carrots
- Salt and pepper, to taste
Optional Swaps & Add-ins:
- Hummus instead of cream cheese for a vegan version
- Roasted red peppers, pickles, or avocado for extra flavor
- Tortilla wraps can be gluten-free or low-carb depending on preference
Step-by-Step Instructions
Step 1: Prepare the Spread
In a medium bowl, mix softened cream cheese, mayonnaise (if using), garlic powder, and Italian seasoning until smooth. This creamy base helps hold the wraps together and adds tons of flavor. You can also mix in herbs or hot sauce for extra flair.
Step 2: Lay Out the Tortilla
Place a tortilla on a flat surface like a cutting board. Spread a generous, even layer of the cream cheese mixture all the way to the edges. Getting the corners ensures every slice has flavor and structure.
Step 3: Add Layers of Goodness
Start layering your fillings: lay down a few slices of deli meat, followed by slices of cheese. Add a handful of spinach, red bell peppers, cucumbers, and carrots for crunch and color. Keep ingredients evenly spaced and don’t overfill — this helps with a tight roll.
Step 4: Roll It Up Tightly
Starting from one end, roll the tortilla tightly like a jelly roll. The tighter the roll, the better the slices will hold their shape. Once rolled, wrap it in plastic wrap and refrigerate for at least 30 minutes (or overnight for best results).
Step 5: Slice Into Pinwheels
Remove the wrap from the fridge and unwrap. Use a sharp or serrated knife to slice off the ends (they’re usually uneven) and then cut into 1-inch thick pinwheels. Wipe the knife between slices for cleaner cuts.
Step 6: Serve and Enjoy
Arrange the pinwheels on a serving platter. If desired, secure each with a toothpick. Garnish with fresh herbs or serve with dipping sauces like ranch or honey mustard. They’re great cold and make for a fresh, satisfying bite.
Nutrition Facts (Approx. per 3 pinwheels)
- Calories: 210
- Protein: 9g
- Carbohydrates: 15g
- Fiber: 2g
- Total Fat: 13g
- Saturated Fat: 5g
- Sodium: 480mg
- Vitamin A: 20% DV
- Vitamin C: 15% DV
- Calcium: 10% DV
- Iron: 8% DV
Tips for Success
1. Chill Before Slicing
This helps the ingredients firm up and stay in place while cutting. Slicing warm or fresh wraps can lead to messy, uneven pieces.
2. Don’t Overfill
Too many fillings make it hard to roll tightly and may cause the wrap to split. A thin, even layer works best for both structure and appearance.
3. Use a Serrated Knife
A clean, sharp serrated knife makes slicing through the layers easier and keeps the pinwheels neat and round. Avoid squishing by using a gentle sawing motion.
4. Customize the Spread
Adding pesto, hummus, or flavored cream cheese can drastically change the flavor profile. It’s an easy way to create multiple varieties with minimal effort.
Common Questions
Can I make pinwheel wraps ahead of time?
Yes! You can make them a day in advance. Just wrap them tightly in plastic and refrigerate. Slice just before serving to keep them fresh and tidy.
Are these wraps freezer-friendly?
Not really — the fresh veggies and cream cheese don’t hold up well in the freezer. These are best kept refrigerated and eaten within 2 days.
What tortillas work best?
Flour tortillas are ideal because they’re soft and flexible. For a gluten-free option, look for gluten-free wraps, but test them first as some can crack when rolled.
How can I make these vegetarian?
Simply leave out the meat and load up on veggies or use hummus as the base. Roasted red peppers, shredded cabbage, and sliced olives add great flavor and texture.
Variations & Substitutions
- Southwest Style: Use chipotle mayo, grilled chicken, black beans, corn, and pepper jack cheese.
- Mediterranean: Use hummus, feta cheese, cucumber, olives, and sun-dried tomatoes.
- Caprese Twist: Layer basil pesto, mozzarella, tomato slices, and arugula for a fresh Italian flavor.
- Breakfast Pinwheels: Spread cream cheese, scrambled eggs, and cooked bacon for a fun morning version.
Serving & Pairing Suggestions
Pinwheel wraps are incredibly versatile and go well with almost anything. Serve with fresh fruit, veggie sticks, or chips for a casual lunch. For parties, pair them with dips like guacamole, salsa, or ranch. They also make great companions for soups or salads for a light meal.
Storage & Reheating Tips
Store leftover pinwheels in an airtight container in the refrigerator for up to 2 days. To keep them from drying out, wrap them in plastic wrap or cover with a damp paper towel. Avoid microwaving — they’re best served cold or at room temperature.

Pinwheel Wraps
Ingredients
- 4 large flour tortillas 10-inch; spinach or tomato-flavored for color if desired
- 8 oz cream cheese softened
- ¼ cup mayonnaise optional, for a creamier base
- 1 tsp garlic powder
- 1 tsp dried Italian seasoning
- 6 –8 slices deli turkey or ham or a mix
- 6 slices cheddar or provolone cheese
- 1 cup baby spinach or lettuce leaves washed and dried
- ½ red bell pepper thinly sliced
- ½ cucumber julienned or thinly sliced
- ¼ cup shredded carrots
- Salt and pepper to taste
Optional Swaps & Add-ins
- Hummus instead of cream cheese for a vegan version
- Roasted red peppers pickles, or avocado for extra flavor
- Tortilla wraps can be gluten-free or low-carb depending on preference
Instructions
- In a medium bowl, mix softened cream cheese, mayonnaise (if using), garlic powder, and Italian seasoning until smooth. This creamy base helps hold the wraps together and adds tons of flavor. You can also mix in herbs or hot sauce for extra flair.
- Place a tortilla on a flat surface like a cutting board. Spread a generous, even layer of the cream cheese mixture all the way to the edges. Getting the corners ensures every slice has flavor and structure.
- Start layering your fillings: lay down a few slices of deli meat, followed by slices of cheese. Add a handful of spinach, red bell peppers, cucumbers, and carrots for crunch and color. Keep ingredients evenly spaced and don’t overfill — this helps with a tight roll.
- Starting from one end, roll the tortilla tightly like a jelly roll. The tighter the roll, the better the slices will hold their shape. Once rolled, wrap it in plastic wrap and refrigerate for at least 30 minutes (or overnight for best results).
- Remove the wrap from the fridge and unwrap. Use a sharp or serrated knife to slice off the ends (they’re usually uneven) and then cut into 1-inch thick pinwheels. Wipe the knife between slices for cleaner cuts.
- Arrange the pinwheels on a serving platter. If desired, secure each with a toothpick. Garnish with fresh herbs or serve with dipping sauces like ranch or honey mustard. They’re great cold and make for a fresh, satisfying bite.
Notes
This helps the ingredients firm up and stay in place while cutting. Slicing warm or fresh wraps can lead to messy, uneven pieces. 2. Don’t Overfill
Too many fillings make it hard to roll tightly and may cause the wrap to split. A thin, even layer works best for both structure and appearance. 3. Use a Serrated Knife
A clean, sharp serrated knife makes slicing through the layers easier and keeps the pinwheels neat and round. Avoid squishing by using a gentle sawing motion. 4. Customize the Spread
Adding pesto, hummus, or flavored cream cheese can drastically change the flavor profile. It’s an easy way to create multiple varieties with minimal effort.
There’s just something about pinwheel wraps that makes people smile. Maybe it’s their playful shape or their vibrant colors.
Whatever it is, they never last long once they’re on the table.
So whether you’re prepping lunchboxes or planning your next party spread, give these pinwheel wraps a try.
They’re easy, tasty, and guaranteed to be a hit — no matter the crowd or occasion. Happy rolling!